Pechugas Villaroy (Breaded Cream-Coated Chicken Breasts) Recipe
If you’re looking to impress at dinner, Pechugas Villaroy is your go-to recipe! Imagine this: juicy chicken breasts coated in a luscious creamy sauce, then wrapped in crispy breadcrumbs. You’ll need about four boneless chicken breasts, half a cup of flour, and a cup of milk to start. Don’t worry if you prefer turkey; it works just as well! Let’s get into the details of transforming these ingredients into a delightful dish that’ll have everyone asking for seconds.
Ingredients Needed for Pechugas Villaroy
When you’re ready to whip up some delicious Pechugas Villaroy, you’ll want to gather a few key ingredients that make this dish truly special. You’ll need boneless chicken breasts, about four, plus flour, eggs, and breadcrumbs for that perfect crunch. Don’t forget cream and cheese for the luscious filling! If you’re feeling adventurous, swap out chicken for turkey. Enjoy the process!
Preparing the Chicken Breasts
Let’s plunge into preparing those chicken breasts!
First, you’ll want to get everything ready. Here’s what you need:
- 2 boneless, skinless chicken breasts
- A meat mallet or rolling pin
- Salt and pepper to taste
- A clean cutting board
- Your favorite cooking oil
Pound the chicken to an even thickness, season, and you’re all set for the next step!
Making the Creamy Sauce
While making the creamy sauce might seem like a simple step, it’s truly where the magic happens!
Start by melting 2 tablespoons of butter in a pan, then whisk in 2 tablespoons of flour for a smooth roux.
Gradually add 1 cup of milk, stirring until thickened. If it’s too thick, a splash more milk works wonders.
Your cozy sauce is ready to elevate those chicken breasts!
Coating the Chicken
Coating the chicken is where the fun really begins!
You’ll want to guarantee every piece is ready for its delicious transformation.
Here’s what you’ll need:
- Creamy sauce for a luscious base
- A sprinkle of salt for flavor
- A dash of pepper for a kick
- A touch of paprika for warmth
- A pinch of garlic powder for that extra zing
Enjoy the process!
Bread Crumbing the Chicken
Now it’s time to add that irresistible crunch by breading the chicken! You’ll start by dipping each piece into breadcrumbs. Choose between homemade or store-bought options. Here’s a quick visualization of the process:
| Step | Description |
|---|---|
| 1. Dip | Coat chicken in eggs. |
| 2. Breadcrumbs | Roll in breadcrumbs thoroughly. |
| 3. Rest | Let sit for a few minutes. |
| 4. Repeat | For extra crunch, double coat! |
| 5. Ready | It’s almost time to fry! |
Frying the Chicken Breasts
Get ready to hear that sizzle! As you drop the chicken breasts into the hot oil, watch them transform into golden perfection.
- A rich, crispy crust forms
- The aroma fills your kitchen
- Bubbles dance around the chicken
- The oil pops in delight
- Your mouth waters in anticipation
Fry each side for about 4-5 minutes, and don’t forget to flip them carefully!
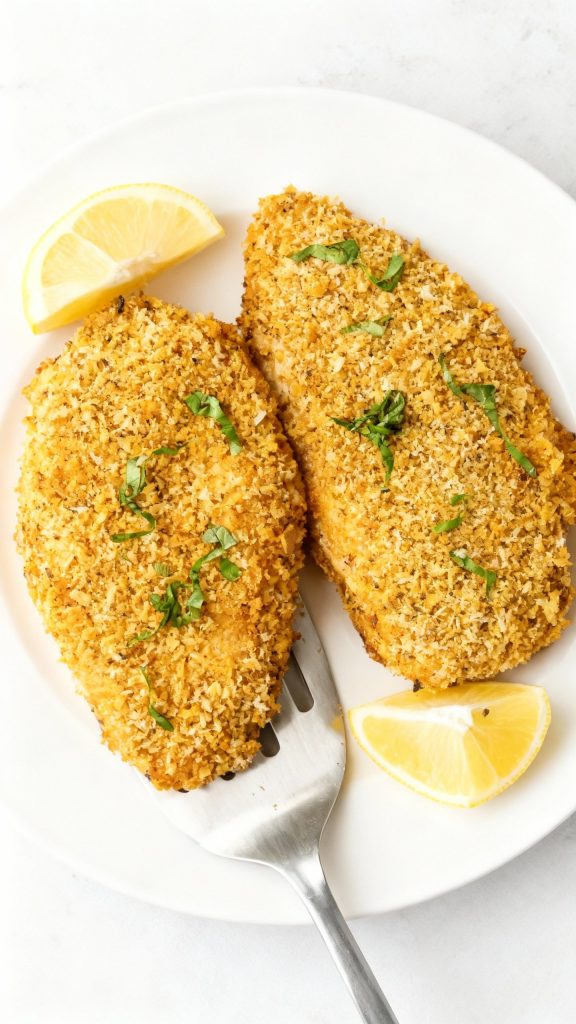
Serving Suggestions
When you finally plate those beautifully fried pechugas, the fun really begins! Serve them hot, drizzled with lemon juice for a zesty kick.
Pair with a side of fluffy rice or a fresh salad for balance. Don’t forget a dollop of creamy avocado sauce! Trust me, it’ll elevate your meal.
Enjoy every bite; you’ve earned it after all that frying!
Storing Leftovers
Leftovers can be a real treat, especially after enjoying those crispy pechugas!
To keep them fresh, follow these tips:
- Store in an airtight container.
- Refrigerate within two hours.
- Enjoy within 3-4 days.
- Reheat in the oven for that crispy texture.
- Freeze for up to three months for later enjoyment!
Trust me, you’ll love reliving that delicious meal!
Variations and Tips
After savoring those crispy pechugas, you might be wondering how to mix things up next time.
Try adding herbs like oregano or thyme to the cream for an aromatic twist. You can swap chicken for turkey or use gluten-free breadcrumbs for a lighter option.
And hey, if you burn them a little, just call it “extra crispy”—I won’t tell anyone!